Secure GitHub pages with HTTP Authentication using Lambda@Edge
GitHub Pages is a great way to serve a static website in a serverless pattern for free. Lots of people make use of it for documentation and personal projects.
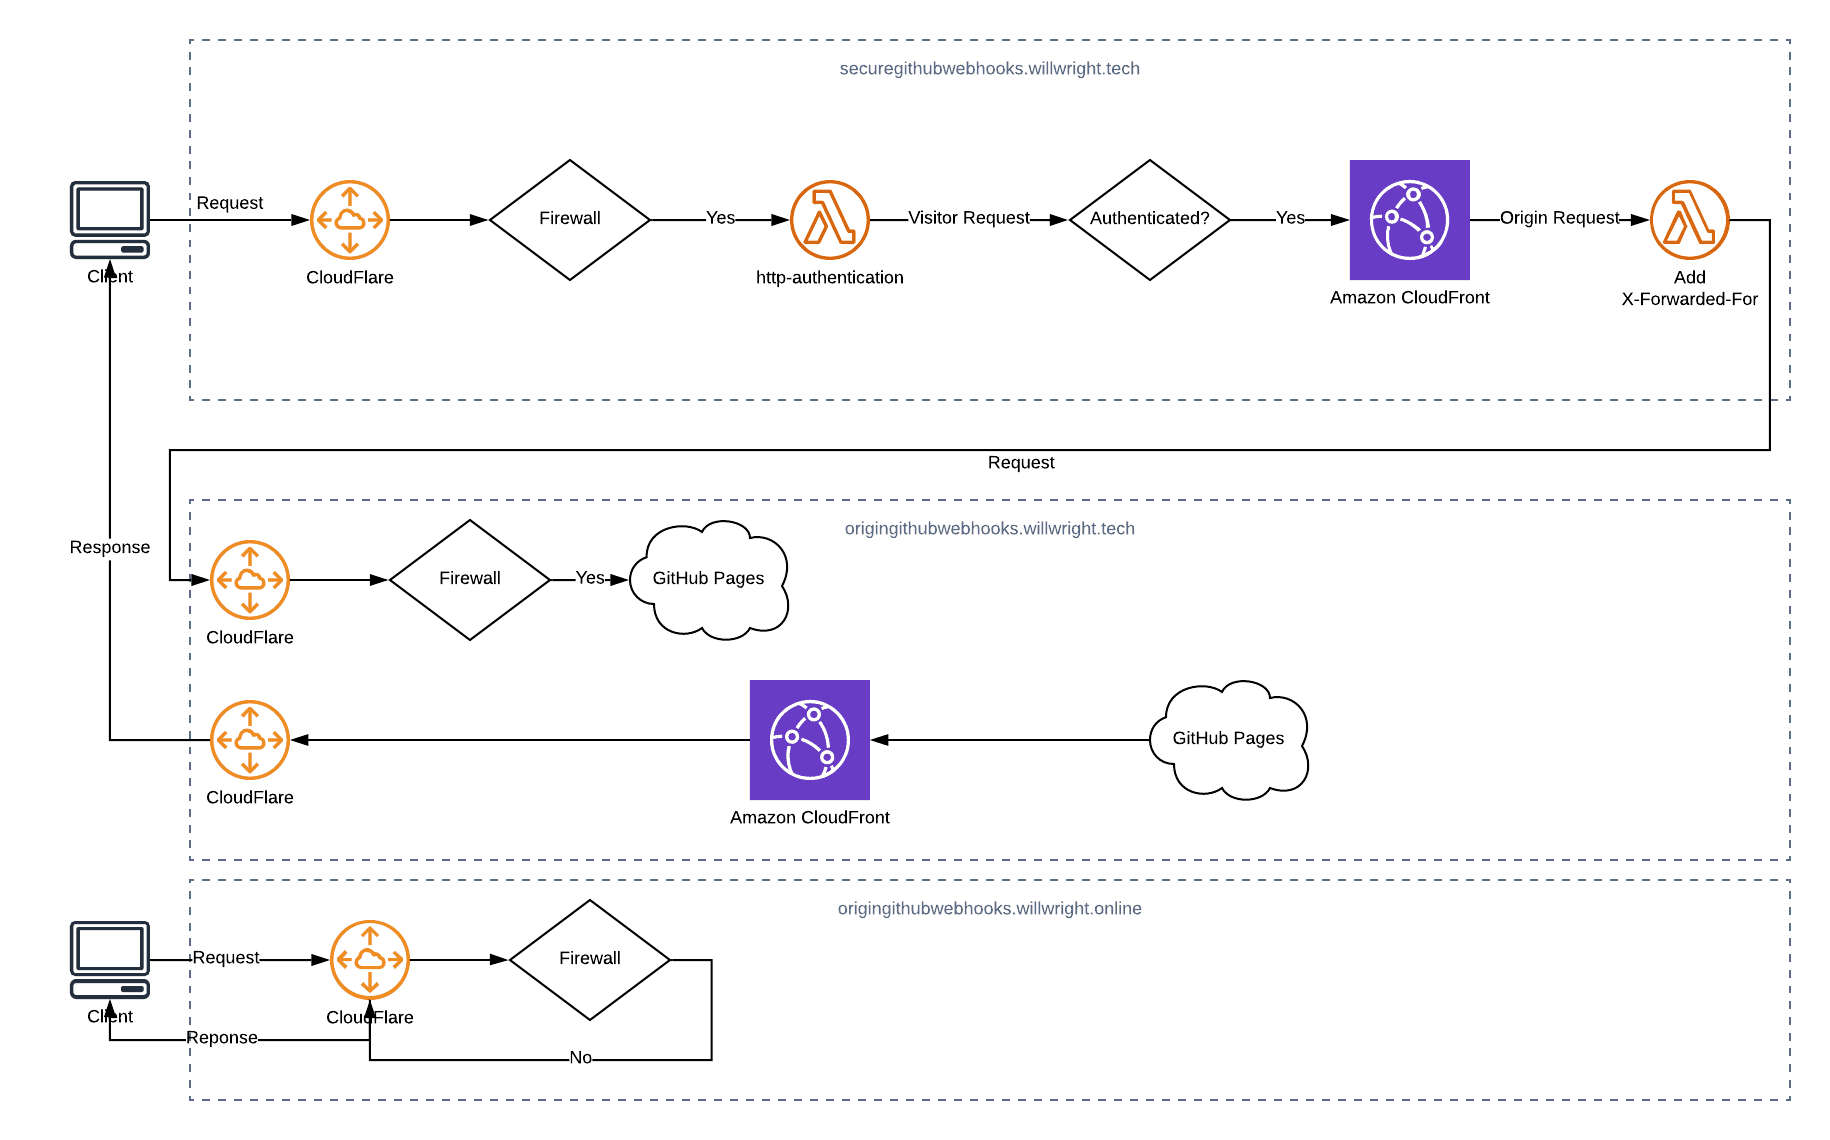
I recently thought about using GitHub Pages to serve documentation for a project that I have been involved with at work. The issue that I ran into is that I can’t find a good way secure the site.
The project is private, the repository is private and the documentation needs to be private.
Requirements:
- Use Jekyll to produce the site
- Serverless architecture
- Authentication
I found Jekyll Auth pretty quickly but I didn’t want to host in Heroku. I also found a handful of other Jekyll authentication projects but so far as I could tell they were all based on client-side JavaScript authentication in one form or another which just ins’t very secure (in my opinion).
Then I stumbled across these two gems:
Serverless: password protecting a static website in an AWS S3 bucket
A Step-by-step Guide to Creating a Password Protected S3 bucket
If you can secure a S3 Bucket using this patten then I thought maybe I can secure a GitHub Page. Down the rabbit hole we go.
Overview

Prerequisites:
- A GitHub repo with a static site to publish
- A TLD that you have DNS control over
- An AWS account
- A CloudFlare account
For the following example I’m going to use:
origingithubwebhooks.willwright.tech
- must not be publicly accessible
securegithubwebhooks.willwright.tech
- should be publicly accessible
- must be protected via HTTP Authentication
githubwebhooks.willwright.tech
- must be publicly accessible
Create GitHub site
Follow the guide here to create a site on GitHub Pages: https://pages.github.com/
Once you have a site up you need to setup a custom domain name following the instructions: Configuring an apex domain

These DNS records need to go into CloudFlare because we’re eventually going to use the Firewall rules there.

Test that your site resolves by going to the origin domain name that you’ve setup.
GET: https://origingithubwebhooks.willwright.tech/

Create CloudFront Distribution
Go to your AWS and open the CloudFront service panel. Click “Create Distribution”
Origin Domain Name: Enter the domain of your origin. I’ve used “origingithubwebhooks.willwright.tech”
Origin Protocol Policy: HTTPS Only
View Protocol Policy: Redirect HTTP to HTTPS
Alternative Domain Names (CNAMES): Enter the domain name you want people to use to access your site. I’ve used “securegithubwebhooks.willwright.tech”
SSL Certificate: Choose Custom SSL Certificate and work through the Amazon help document to create an SSL. You need this in order to use a CNAME.

Test that the domain name of your distribution returns your site.
GET: https://d2k5dsttl7gwtv.cloudfront.net
Configure CloudFlare
Open your account in CloudFlare. Go to you DNS configuration. Create a CNAME record from the domain you want to be publicly accessible to the CloudFront distribution domain.
Set the Proxy status to “DNS only”

Test that your CNAME record returns your site.
GET: https://securegithubwebhooks.willwright.tech/
Configure Firewall
We want origin to not be publicly accessible.
Goto: CloudFlare > Firewall > Firewall Rules
Click Create a Firewall rule
Set a name and then block your origin’s domain name.

Test that origin is no longer publicly accessible.
GET: https://origingithubwebhooks.willwright.tech/

This good but we need CloudFront and only CloudFront to have access to our origin.
Add another Firewall Rule to allow origin when there is a specific X-Forwarded-For header.
I used a random password generator to generate my “key”.
Test that origin is available when the X-Forwarded-For header is set. I used postman so that I could set the header arbitrarily.

Create Lambda@Edge Functions
CloudFront is now locked out of origin because it’s not passing along the correct X-Forwarded-For header value.
Go to your AWS account and open the IAM service console.
Select: Access management > Roles
Click “Create role”
Select “AWS Service”
Click “Lambda”
Click “Next”

Filter policies type: “Lambda”
Check “AWSLAmbdaBasicExecutionRole”
Click “Next”

Add a Role Name; I’ve chosen “Lambda@Edge”. Click “Create”.
Find your new Role and click it to get to the edit screen.

Click “Trust relationships”
Click “Edit trust relationship”
Modify the “Service” list such that it includes “edgelambda.amazon.com”
{
  "Version": "2012-10-17",
  "Statement": [
    {
      "Effect": "Allow",
      "Principal": {
        "Service": [
          "edgelambda.amazonaws.com",
          "lambda.amazonaws.com"
        ]
      },
      "Action": "sts:AssumeRole"
    }
  ]
}
Click “Update Trust Policy”
Go to your AWS account and get to the Lambda service console.
You must chose US-East-1
You can add triggers only for functions in the US East (N. Virginia) Region.
Source: https://docs.aws.amazon.com/AmazonCloudFront/latest/DeveloperGuide/lambda-requirements-limits.html
Choose > Functions > Create Function
Select: Author from scratch
Enter a name. I’ve used; “http-forward-header”
Runtime chose: Python 3.7
Expand Permissions
Execution Role select: Use an existing role
Select the role your create. Mine is “Lambda@Edge”
Click “Create Function”

Enter the following into the code editor
import base64
import json


def lambda_handler(event, context):
    # Forward Code to key off inside Firewall
    forward_header = {
        "x-forwarded-for": [{"key": "X-Forwarded-For", "value": "REPLACEME"}]
    }

    # If the X-Forwarded-For header exists; delete it so that we can use our own custom header
    if "x-forwarded-for" in event["Records"][0]["cf"]["request"]["headers"]:
        del event["Records"][0]["cf"]["request"]["headers"]["x-forwarded-for"]

    # Add custom X-Forwarded-For header
    request = event["Records"][0]["cf"]["request"]
    request["origin"]["custom"]["customHeaders"].update(forward_header)

    return request
You must replace “REPLACEME” in the function above with your “key”.
Click “Save”
Select “Actions”
Select “Publish new Version”
Select “Version”
Verify that you have the latest published version selected, not “$LATEST”

Click “Add trigger”
Select “CloudFront”
Distribution: Select the distribution you setup earlier
CloudFront event: “Origin Request”
Click “Add”

You should see the trigger attached to your function

At this point your public domain should work and your origin domain should not work.
GET: https://securegithubwebhooks.willwright.tech/

GET: https://origingithubwebhooks.willwright.tech/

Now all we have to do is add HTTP Authentication and we’re done
Create HTTP Authentication
Go to your AWS account and get to the Lambda service console.
You must chose US-East-1
Click “Create Function”
Chose: “Author from scratch”
Function name: Set your function’s name (I chose “http-auth”)
Runtime: Python 3.7
Expand Permissions
Execution Role: Use an existing role
Function code: Enter the following
import base64
import json


def lambda_handler(event, context):
    username = "user"
    password = "password"
    auth_value_str = "{}:{}".format(username, password)
    auth_value_bytes = auth_value_str.encode('UTF-8')

    auth_string = "Basic " + str(base64.b64encode(auth_value_bytes), "UTF-8")

    # Require authentication
    headers = event["Records"][0]["cf"]["request"]["headers"]
    if "authorization" not in headers or headers["authorization"][0]["value"] != auth_string:

        body = "Unauthorized"
        response = {
            "status": "401",
            "statusDescription": "Unauthorized",
            "body": body,
            "headers": {
                "www-authenticate": [{"key": "WWW-Authenticate", "value": "Basic"}]
            }
        }

        return response

    # Continue request processing if authentication passed
    return event["Records"][0]["cf"]["request"]
Note: username and password are set at the top of the file. Set them to whatever you wish.
Publish the function
Select the latest published version
Click “Add trigger”
Select “CloudFront”
Distribution: Your distribution
CloudFront event: View request
Click “Add”

Test that your public domain is now protected with HTTP Authentication
GET: https://securegithubwebhooks.willwright.tech/

You’re done!
You can actually use this pattern for adding HTTP authentication to any site that you can set a CNAME for.